Wednesday, February 26, 2020

Homemade Almond Pasta


I love Saturdays. Every other day of the week is filled with work and routine, but Saturday is my one day to really spend time in the kitchen. That's the way it was for my mom. 

Early Saturday morning I would awake to the aroma of yeast dough proofing in the pantry, waiting to be formed into loaves of bread, rolls, or coffee cake. And while waiting for the dough to rise there would be a pie in the makingapple, peach, maybe apricot, rhubarb, or (Daddy's favorite) gooseberry.

And then, in the afternoon while the bread was baking and pies were cooling, mom would make pasta dough for egg noodles.


Mom made the most amazing noodles. They were hand-rolled—paper-thin, and light as air. And when she wasn't looking (or so I thought) I would grab a bit of the raw dough and pop it in my mouth. Flour-y, eggy, salty wonderfulness!! As the years passed Mom's arthritis made it impossible for her to wield the rolling pin that formed those thin layers of pasta dough. So Daddy bought a pasta machine for her.


I have Mom's pasta machine now, and whenever I use it I think of her. Today with the help of Mom's pasta buddy I made noodles. But these were no ordinary noodles. In my pantry is a large (I mean REALLY large) package of sliced almonds. I found them in our local warehouse store; they were just too great of a bargain to resist. They have appeared in salads, cakes, and cookies. 
And today they served as my inspiration for this pasta.

Almond Pasta

Ingredients
  • 1/2 cup sliced almonds
  • 1 tablespoon wheat gluten
  • 1 tsp. salt
  • 1 1/2 cups all-purpose flour
  • 2 eggs
Instructions
  1. Process the almonds in a food processor until ground. However, don't process to the point of having almond butter. There should be a bit of texture in your pasta. 
  2. To the same bowl add the wheat gluten, salt, and flour. Pulse until mixed. 
  3. Add the eggs and process until a stiff dough forms and cleans the sides of the bowl. This will take a few moments and a bit of patience. At first, it will seem that the dough will not come togetherit will be a bowl full of crumbs. But as the gluten in the flour breaks down, your dough will come together. Trust me!
  4. With a pasta machine or by hand roll the dough out to desired thinness. When rolling out the dough, your goal is a thickness somewhere between 1/8 and 1/16 inch thick. If rolling out by hand, you will need to
    (a) cover the dough with a bowl and allow to rest for 15 minutes,
    (b) use a large well-floured surface, and
    (c) lift and flip over your dough several times to
     ensure that it doesn't stick to your work surface.
  5. If using a pasta machine, use the setting you prefer to cut your noodles to the desired width. If cut by hand, you have two options.
    (a) You may use a pizza wheel to slice the dough into strips of the desired width, or
    (b) liberally flour the top surface of the dough, roll it up jelly-roll fashion, and then slice it into ribbons of the desired width (this option takes a bit more patience)Once all the dough is cut into noodles, sprinkle again with flour and toss so that all pieces are coated with flour to prevent sticking.
  6. Bring a large kettle of water to boil. Place your noodles in a colander. Shake to remove excess flour and then drop the noodles into the boiling water. Cook until done; the amount of time needed will depend upon the thickness of your dough. Very thin noodles might need only 2 minutes. Thicker noodles will require 5 minutes or more. Sample, taste, assess, and enjoy when ready!

NOTE: Wheat gluten is available in health-food stores and in many major grocery stores in the baking goods section. Gluten provides the "glue" that binds dough and makes it sticky and pliable. A bit of gluten is needed in this recipe because almonds (which do not contain gluten) are taking the place of some of the flour.

Wednesday, February 19, 2020

Recycled Cookies


I have a confession to make. Yesterday, I rediscovered the cookie jar in the back of the pantry. I don't know how it got there. My heart breaks thinking of the lonely days (weeks?) it might have spent back there feeling unappreciated, neglected, and alone.

And yes, there were cookies within. Oatmeal cookies with pumpkin kisses. The kisses still look wonderful, but the cookie part is horribly stale. The kisses can be snapped off and are "as good as new," but what about the oatmeal cookie that was left behind?

I can't and won't throw them away; my frugal heart just won't allow that. 


Well, years ago I was lucky enough to get a recipe from my local bakery—Recycled Cookies. (This was long before recycling was in vogue). This recipe is the perfect answer for those times when you have cookies, cake, or (at New Year's?) fruitcake that seems past its prime.


Recycled Cookies

Ingredients
  • 1 cup shortening
  • 1 cup brown sugar
  • 1 cup white sugar
  • 2 eggs
  • 1 tsp. vanilla
  • 1 1/2 cups flour
  • 1 tsp. salt
  • 1 tsp. soda
  • cups rolled oats (not instant oatmeal)
  • 2 - 2 1/2 cups crumbled cookies, cake, or fruitcake

Instructions
  1. Cream together shortening and sugars. Beat in eggs and vanilla. Stir in flour, salt, soda, and cookie/cake/fruitcake crumbs. 
  2. At this point, you will need to add some liquid to moisten. If you have used chocolate cookie crumbs/cake add milk or coffee. Otherwise, use orange or apple juice. You want to add just enough to moisten but not end up with a sticky/gluey mass. 
  3. Form the dough into a roll 2 inches in diameter. Wrap in plastic wrap and freeze until firm. Slice 1/4 inch thick and bake on a lightly greased baking sheet at 375 degrees F for about 8 minutes.

Saturday, February 1, 2020

Super Bowl Sunday


When my team is playing, I love Super Bowl Sunday. Unfortunately, this year "the other guys" are the star of the show. But we can still enjoy the Puppy Bowl, Kitty Half-Time, the Budweiser ad, and (best of all) the food.

Here is one dish that might be in my oven on Sunday:


Photo Credit: Image by tarheelgarden from Pixabay 


Seafood Nachos


Preheat oven to 350 degrees F.


On a heatproof platter, layer the following ingredients in the order given:

  • tortilla chips
  • chopped green chilies
  • chopped, seeded tomato
  • sliced ripe olives
  • minced green onion
  • canned black beans, rinsed and drained
  • cooked shrimp and/or imitation crab flakes
  • shredded Cheddar or Jack cheese

  • Repeat layers once. Bake until heated through and cheese is melted. Serve with sour cream and guacamole.

    Wednesday, January 15, 2020

    Quiche with Tater Tot Crust


    Of all the "carb diva" foods I make in my kitchen, quiche has to be in the top 10 of my favorites.
    • It's so versatile. You can serve it for breakfast, brunch, lunch, dinner or even as an appetizer. 
    • You can adapt the basic recipe to just about whatever ingredients you have in your refrigerator. Change the cheese, change the protein.
    • It's a tasty way to get your family to eat more veggies.
    There is one downside, however. The pastry crust. I'm pretty darned good at making pie dough, but depending on the humidity it can be a tad fussy. Sometimes I'm just not in the mood for fuss. Yesterday was that kind of day, so I made a quiche with a potato crust.

    I took a few photos during the process but didn't have a recipe (I'm making this up as I go). Here's what I did.

    Quiche With Tater Tot Crust


    Equipment and Ingredients
    • a tart pan with removable bottom
    • parchment paper
    • straight-sided drinking glass or measuring cup
    • measuring cups
    • wire whisk
    • frozen tater tots (about 4 cups)
    • 1 cup cooked chicken Italian sausage (see other suggestions below)
    • 1/2 cup diced red bell pepper
    • 1 cup shredded Parmesan cheese
    • 4 large eggs
    • 1/2 cup milk
    Instructions
    (1) Preheat oven to 200 degrees F.

    (2) Line a tart pan with a sheet of parchment paper. Here's the first Carb Diva trick for you. My parchment is notoriously uncooperative. It's stiff and doesn't like to nestle into the bottom of a pan. Simply take that sheet of paper and wad it up into a ball. Don't be gentle. Then unwrap; it will now submit to your will and line the bottom and sides of your tart pan.

    (3) Fill the tart pan with tater tots—be generous but don't crowd them in.
    Place in the preheated oven and "bake" for 5 minutes, just enough to thaw the tots.
    Remove from the oven and allow to sit for a few minutes to cool.

    (4) Grab that drinking glass (or measuring cup) and use it to squish the no longer solid tater tots over the bottom of the pan and up the sides. Be sure to completely cover the bottom of the pan.


    (5) Increase the oven temperature to 350 degrees F.

    (6) Bake the tater tot crust for 15 minutes, or until golden and crisp on the edges. Remove from the oven.


    (7) Layer on the meat. I used chicken Italian sausage, but you can use your imagination here. 

    (8) Next, add the veggies, and then the cheese.


    (9) Whisk the 4 eggs with the milk until well-blended. Pour over the cheese layer. Bake the quiche for 30 minutes or until the eggs are set


    Meat Suggestions
    • cooked ground beef, turkey, or chicken
    • vegetarian crumbles (faux ground beef)
    • pulled pork
    • diced cooked ham
    • crisp-cooked crumbled bacon
    Cheese Suggestions
    • Cheddar
    • Swiss
    • Mozzarella
    • Parmesan
    • Colby
    • Cheddar jack
    • Provolone
    Veggie Suggestions
    • diced bell pepper
    • diced onion
    • chopped tomato, seeds removed
    • broccoli florets
    • asparagus tips
    • black olives


    Wednesday, January 8, 2020

    Gorgonzola Chicken


    When did I first make this meal? I have no idea. Was there a special occasion? Maybe. 
    What I do know is that I posted this on my other website where my alter-ego lives. It was one of the first recipes that I recorded there. Since then, I've found my voice on that web place, and it isn't merely posting recipes. I explore individual food ingredients, delve into their history, and then find interesting ways to use that specific ingredient. 
    So, those "early postings" I will move here. One at a time. This one is (in my humble opinion) pretty good. I hope you enjoy it.


    Chicken Gorgonzola with Marsala Mushrooms

    Ingredients
    • 6 medium boneless, skinless chicken thighs
    • 1/2 teaspoon salt
    • 1/2 teaspoon freshly ground black pepper
    • 2 tablespoons olive oil
    • 2 strips of bacon or turkey bacon
    • 1/2 small onion, minced (about 1/2 cup)
    • 2 cups white button mushrooms, sliced
    • 1/3 cup marsala wine
    • 1 cup half and half
    • 1/2 cup Gorgonzola cheese, crumbled
    • 1 10-ounce package frozen chopped spinach, thawed and squeezed dry

    Instructions

    1. Preheat oven to 375 degrees F.
    2. Season the chicken thighs with salt and pepper. Add the olive oil to an oven-safe  medium sauté pan and heat to medium-high. Place the thighs in the pan and reduce the heat to low. Saute until the underside is beautifully golden, about 7-8 minutes. Turn the thighs over. Transer the saute pan to the preheated oven and roast the thighs until the internal temperature reaches 165 degrees F, about 5 minutes. Remove the thighs to a plate, cover with foil, and set aside.
    3. Next, in the same saute pan cook the bacon, onion, and mushrooms over medium-high heat. Be careful! The handle of that pan is extremely hot! Cook, stirring frequently, until the bacon is crisped and the mushrooms and onions are golden. 
    4. Add the Marsala wine. Cook until Marsala reduces a bit then add the half and half. Cook for a few minutes, until the half and half reduced a bit and has a sauce-like consistency. Stir in the Gorgonzola. When it is melted, taste the sauce for seasoning. (The cheese and bacon are salty so you probably won't need any additional salt).
    5. Add the spinach and then nestle the chicken thighs into the pan. 
    6. When chicken is ready, remove from oven; place one cooked chicken breast on each serving plate and top with mushroom-Marsala-Gorgonzola sauce. Reduce the heat to a simmer and cook for a few minutes, until everything is heated.
    7. Serve immediately over rice, linguine, or whipped potatoes.

    What Makes This Recipe Work?

    • Boneless, skinless chicken thigh is a healthy, no-waste protein.
    • Frozen chopped spinach is convenient, inexpensive, and nutritious; and again, no waste.
    • Bacon or turkey bacon lends a smokey, savory note.
    • Sauteing the onion removes its hot bite and makes it sweet.
    • You deserve the mushrooms; they make any dish "fancy", don't they?
    • Marsala wine, half and half, and Gorgonzola marry to make a creamy, sweet, tangy sauce that unites all of the flavors of the dish and makes it rich and luxurious.

    Saturday, January 4, 2020

    Oatmeal Pancakes


    How are those resolutions working out for you? If one of your goals for 2020 was to eat healthier, I have a recipe to share with you.

    Here's a hearty, healthy pancake that takes a bit of planning (part of the batter needs to rest overnight in the refrigerator), but it's well worth the wait.

    Oatmeal Pancakes

    Cook Time.

    Prep time: 12 hours,
    Cook time: 10 min.
    Ready in: 12 hours 10 min.
    Yields: Who knows? This feeds 4 people in my house

    Ingredients

    • 2 cups regular rolled oats, not instant
    • 2 cups buttermilk, or 2 teaspoons cider vinegar plus enough milk to make 2 cups
    • 2 eggs, lightly beaten
    • 1/4 cup butter or margarine, melted and cooled
    • 1/2 cup raisins or dried cranberries, fresh blueberries, chocolate chips, etc.
    • 1/2 cup all-purpose flour
    • 2 tablespoons sugar
    • 1 teaspoon baking powder
    • 1 teaspoon baking soda
    • 1/2 teaspoon ground cinnamon
    • 1/4 teaspoon salt
    1. In a medium bowl combine oats and buttermilk (or soured milk). Stir to blend. Cover and refrigerate overnight.
    2. In the morning add the eggs, melted butter, and raisins--stir just to blend. In another bowl combine all of the remaining ingredients. Add to the oatmeal mixture and stir just until moistened.
    3. Cook on a lightly greased griddle or frying pan over medium-high heat. Use about 1/4 cup of batter for each pancake.


    So What are the Health Benefits of Oatmeal?

    Oatmeal is truly a "superfood". Packed with soluble fiber and healthy nutrients, oatmeal is a nutritional superhero. According to the National Heart, Lung, and Blood Institute, elevated total cholesterol is a chief risk factor for cardiovascular disease. Soluble fiber-rich foods such as oatmeal are an effective way of reducing elevated cholesterol levels.
    Sticking to a diet can be challenging if your appetite isn't under control. According to a study published in the October 2009 issue of "Molecular Nutrition & Food Research" a compound in oatmeal reduces appetite by increasing a hunger-fighting hormone. You can help reduce your appetite even further by consuming fibrous foods such as fresh fruits and vegetables with your bowl of oatmeal.
    And then, there is colon cancer. According to the National Cancer Institute, almost 50,000 adults die each year from colon cancer. Antioxidants help reduce colon cancer risk by fighting cancer-causing compounds known as free radicals. Oats are rich in a class of antioxidants known as avenanthramides, which may help reduce colon cancer risk (December 2009 issue of "Nutrition Reviews").

    Wednesday, January 1, 2020

    Cassoulet - A New Twist on an Old Favorite


    I know that some of you are wondering "what is cassoulet"? Does the name sound French? Well, there's a good reason for that—it is. Cassoulet is an all-day-simmered casserole of beans and meats. A Google search of recipes will give you numerous variations made with sausage, veal, venison, and even duck confit. It seems that cassoulet is French for "clean out the refrigerator."

    But I digress. Many people traditionally begin the New Year with cassoulet. I don't like veal or venison, don't get me started on duck, and I don't have all day. So here is a Readers' Digest version of cassoulet. To a few this might be sacrilege. To me, it's just good-tasting, nourishing, savory food that doesn't take all day to cook and doesn't break the bank.


    This is the recipe I created and posted on my blog at HubPages.

    Photo Credit: Nibelle et Baudouin

    Wednesday, November 13, 2019

    Recipe: Salmon and Chanterelles


    Last week I prepared a celebratory dinner for my older daughter in recognition of her 16th anniversary of working with the same company. Way to go Beth! 

    I don't remember where I first got the idea to put these ingredients together, but I know that it sprang from our love for chanterelle mushrooms, a delicacy that can only be gleaned from the forest (they aren't grown commercially) and is available for just a short season (a few weeks to a month) in the Autumn. 

    Ingredients 

    • 18 ounces of fresh salmon filet
    • 2 tablespoons extra virgin olive oil
    • 1 tablespoon unsalted butter
    • 1/2 pound crimini mushrooms, sliced
    • 1/2 pound chanterelle mushrooms, sliced
    • 1/4 cup dry sherry
    • 1 cup half and half
    • 1 cup fresh wild berries (we used blackberries) or 1/2 cup dried cranberries
    • fresh parsley for garnish
    • fresh chopped hazelnuts for garnish (optional)

    Chanterelles are all clean and sliced and ready for the pan


    Chanterelles and crimini mushrooms sauteeing

    Add half and half and let it reduce for a few minutes

    Instructions
    1. Inspect salmon filet for bones. Heat olive oil and butter in large saute pan over medium heat until shimmering. Place filet, skin side down, in saute pan, cover, and saute until cooked through, about 7 minutes (internal temperature of 145 degrees F.)
    2. Remove salmon from pan and set aside; cover with foil to keep warm.
    3. Add mushrooms to the same pan and cook until they begin to brown, about 5 minutes.
    4. Deglaze pan with sherry then add half and half. Continue to cook until the sauce is slightly thickened. 
    5. Break the cooked salmon into chunks (bite-size or a bit larger) and add to the pan. Don't include the skin (it should separate from the cooked meat very easily). Simmer for a minute or two to heat through.
    6. Serve over rice and garnish with berries, parsley, hazelnuts. (We added cooked broccoli too).
    Makes 3-4 servings

    There's the salmon in the pan getting all warm and cozy in the sauce

    Wednesday, October 23, 2019

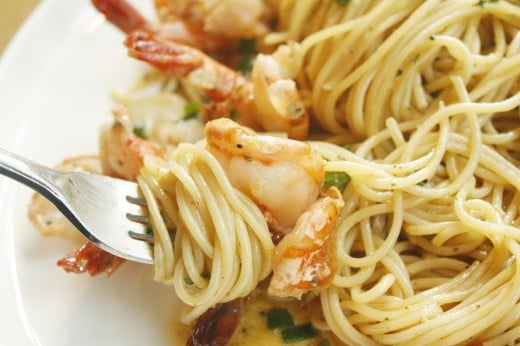
    Pasta with Shrimp and Bacon


    The Yin and Yang of Food

    After surgery or illness have you ever been restricted to a bland diet? You end up eating food that is all the same texture and color. My cat is perfectly content to eat the same kibble day in and day out. But we humans are always looking for some excitement in our meals. It's that lack of "sameness", the contrasts, that make our foods interesting.

    Yesterday I made one of those yin-and-yang meals, and it happened quite by accident. It all started with bacon. I had fresh shrimp and some fettuccine--always a good start. I love shrimp because it cooks quickly and can be taken in so many different directions--with a bit of soy sauce and spices you have an Asian-inspired meal, with cardamon you are dining in Morocco, or with chilies and tomatillos you are south of the border.


    But yesterday I had some bacon in the frig that would soon be past its prime. I also had a few mushrooms about to expire. So I started to think about combining bacon and mushrooms and shrimp. Sure, you can always wrap bacon around shrimp and toss them on the grill, but I wanted to do something in the kitchen (dang, it's cold out there!) So here's what happened:


    Pasta with Shrimp and Bacon

    Ingredients

    • 1/2 pound pasta of your choice
    • 4 slices of honey-maple cured bacon, diced
    • 1 cup crimini or button mushrooms, sliced
    • 2 large cloves garlic
    • parsley, about 1/2 cup (tops only)
    • 1/2 cup walnuts, diced
    • Zest from 1/2 lemon
    • 1 pound of shrimp, shelled and deveined
    • 1/2 cup pecorino romano or Parmesan cheese, grated

    Instructions

    1. Fill a large cooking pot with water and set over high heat to bring to a boil to cook the pasta. (I used fettuccine, but you could use whatever type of pasta you have on hand.) Cook pasta according to package directions; save 1/2 cup of the cooking water then drain the pasta and set aside.
    2. Place the bacon in a large sauté pan, and cook it until it is crisped. Remove it from the pan and set aside. Add the mushroom slices and cook over medium heat until lightly browned. Remove from the pan and set aside.
    3. Place the garlic, parsley, walnuts, and lemon zest into the bowl of a food processor and pulse until the garlic is pulverized and the walnuts are finely minced.
    4. Heat the sauté pan to medium-high heat. Add shrimp to pan and cook until pink, about 4 minutes. Return cooked bacon and mushrooms to sauté pan. Add garlic/walnut mixture and stir together over medium heat. Add cooked pasta to pan. Stir in 1/2 cup of reserved pasta-cooking water. Season to taste with salt and/or pepper if desired. If you like a bit more heat with your meal add a pinch of red pepper flakes.

    So Why is This Recipe Different?

    Sweet shrimp play against the salty taste of the bacon. Acidic lemon vs. the bite of garlic. Toothsome pasta vs. crisp parsley. The crunch of walnuts vs. the creaminess of romano cheese.

    The point isn't to use these specific ingredients. Just think about complements and contrasts in your everyday meals. If you don't have shrimp, substitute chicken. If you don't have parsley, use another fresh herb. No romano? Any other firm cheese would do. No bacon? What else is hiding in your frig that might impart a smoky taste? Perhaps a bit of sausage or kielbasa?

    By the way, the husband all but licked the pan. I hope you can find a way to make this dish your own and enjoy it too!

    Source: Image by Jumi Kang from Pixabay 

    Wednesday, October 2, 2019

    Recipe - Butternut Squash Lasagna with Fennel and Gorgonzola


    Serendipity

    I pity my cat.
    Every day he eats the same chicken kibble--crunch, crunch, chew, chew. Day in and day out he always knows that breakfast, lunch, and dinner will be served at precisely the same time....and he will receive precisely the same thing, day after day after day.
    Despite the obvious luxuries of sleeping 20 hours a day, not paying rent, and "owning" the entire universe, I could not be a cat.
    I love diversity. I love surprise.
    And when cooking, I love to create contrasts in the foods I serve to my friends and family. Pairing creamy with crunchy, or sweet with savory is what makes food interesting and enjoyable. Even the lowly scoop of vanilla ice cream is elevated (no pun intended) when placed atop a crisp waffle cone.

    Last evening I experimented for my family and found a serendipitous combination of sweet and savory that they raved about.

    Butternut Squash Lasagna with Fennel and Gorgonzola

    Cook Time

    Prep time: 30 min
    Cook time: 20 min
    Ready in: 50 min
    Yields: 4 servings
    Equipment You Will Need
    • Large pot for boiling water to prepare pasta sheets
    • Large (10- or 12-inch) sauté pan
    • Large-rimmed baking sheet
    • Parchment paper
    • Sharp knife and cutting board or mandolin for slicing
    • Four 8-ounce ramekins
    Ingredients
    • 4 tablespoons unsalted butter, divided
    • 2 cups (1 large bulb) fennel, thinly sliced (reserve green fronds for another use)
    • 1 medium onion, thinly sliced
    • 2 cups butternut squash, peeled, seeds scooped out, and thinly sliced
    • 1/2 pound cremini mushrooms, sliced
    • 1/2 pound chanterelle oyster mushrooms, wiped clean and sliced
    • 2 tsp. garlic, finely minced
    • 2 tsp. fresh rosemary, finely minced
    • 1 jar Alfredo sauce
    • 1 package of no-boil lasagna noodles, (see note below for specific instructions on how to prepare for this recipe)
    • 1 cup Parmesan cheese, shredded
    • 1/4 cup Gorgonzola cheese, crumbled
    1. Preheat oven to 425 degrees F. Line a rimmed baking sheet with a sheet of parchment paper.
    2. Place the sliced squash in a single layer on the baking sheet. Bake for about 10 minutes or until tender and the squash begins to brown. Remove from oven and set aside.
    3. While the squash is baking, heat the sauté pan over medium-high heat. Add 2 tablespoons of the butter; when the butter has melted and begins to foam add fennel and onion. Sauté until fennel and onions are softened and begin to brown. Remove the fennel and onion to a bowl and set aside. Return sauté pan to heat.
    4. Add the remaining 2 tablespoons of butter to the pan. When melted add the mushrooms, garlic, and rosemary; stir until the mushrooms release their moisture and begin to brown. Remove from heat.
    5. Now begin to assemble the ramekins. Place the ingredients in each ramekin as listed below:
    6. 1 tablespoon of Alfredo sauce in the bottom of each ramekin, then 1 lasagna square.
    7. 1/4th of the squash mixture is followed by 1 tablespoon of sauce and 2 tablespoons of Parmesan cheese.
    8. Another lasagna square, followed by 1/4 of the fennel/onion mixture. Top with 1 tablespoon of sauce and 2 tablespoons of Parmesan cheese.
    9. Another lasagna square, followed by 1/4th of the mushroom mixture. Top with 1 tablespoon of sauce.
    10. One last lasagna squared followed by 3 tablespoons of the Alfredo sauce and 1 tablespoon of the Gorgonzola.
    11. Place in oven and bake 20 minutes or until bubbling. Remove from oven. Allow it to sit for 5 minutes before serving.

    About "cooking" those no-boil lasagna noodles

    Yes, I know--no-boil lasagna noodles are promoted as "no cook". However, if you want to use them in individual-serving dishes (as we do in this recipe), you need to be able to cut them into smaller pieces. Here is how you do it:
    • Bring a large pot of water to boil
    • When the water is boiling, turn off the heat
    • Drop the lasagna sheets into the pot of hot water.
    • Set your timer for 10 minutes.
    • After 10 minutes your pasta sheets will be pliable--al dente--ready to cut to size for your individual-serve ramekins.

    A Few Words about Blue Cheese

    Blue cheese has a distinctive, pungent taste, but not all blue cheeses are created equal. The most popular blue cheeses are Cambozola, Gorgonzola, Maytag Blue, Roquefort, and Stilton.
    1. Cambozola is a German cheese. Unlike other blues, it is creamy and has a much milder flavor. If you are a blue cheese newbie, this might be a good one for you to start with.
    2. Gorgonzola is the blue cheese of Italy. Italian-made Gorgonzolas (Gorgonzola dolce) are creamy and mild; domestic versions made in the United States are sharper and more crumbly.
    3. Maytag Blue is an American blue cheese--it is quite crumbly and pungent.
    4. Roquefort is a French sheep's-milk cheese and is considered to be one of the finest of the blue cheeses.
    5. Stilton is made in England. It's firmer and milder than Roquefort or Gorgonzola.

    A Few Suggestions

    • I have a friend who does not like squash. The amount of mushrooms and/or fennel could be increased, or one could substitute carrots for the squash. Slice them thinly on the diagonal and cook for 2 minutes in boiling water before roasting in the oven.
    • Want to add a bit of crunch? After the lasagna is baked, top each serving with some toasted hazelnuts or pecans.
    • Gotta have meat? Crisp cooked crumbled bacon can be added to each serving after removing from the oven.

    Photo Credit: Image by DonMarciano from Pixabay 

    French Onion Chicken and Pasta

      The Weather Outside Is Frightful I live in the United States—you'll find me in the upper left-hand corner of the map, the Pacific Nort...